Building a deck is one of the most rewarding home improvement projects a homeowner can undertake. Not only does it significantly increase the living space of your property, but it also adds substantial value to your home. Whether you are envisioning a quiet space for morning coffee or a large area for summer gatherings, a well-built deck provides a versatile outdoor extension of your indoor life. This guide will walk you through the entire process, from the initial planning and permitting stages to the final finishing touches, ensuring that your DIY deck is both beautiful and structurally sound.
Planning and Preparation: The Foundation of Success
Proper planning involves site selection, understanding local building codes, and securing necessary permits, points out Keyrenter Chicago North solutions. This phase ensures your deck is safe, legal, and structurally sound before the first board is cut. Skipping these essential steps can lead to costly mistakes, structural failures, or even legal issues with local authorities.
The first step in any deck project is evaluating the site and identifying potential obstacles. You must contact your local utility companies to mark any underground lines before you begin digging for footings. Additionally, you should research your local zoning laws and building codes to determine the required setbacks from property lines and any height restrictions. According to the International Code Council (2021), decks must be designed to support specific live and dead loads, and failure to comply with these standards can result in a deck that is unsafe for use [1].
Once you have a clear understanding of the legal requirements, you can begin selecting your materials. The choice between natural wood, such as pressure-treated pine or cedar, and composite decking is a significant decision that affects both the cost and the long-term maintenance of your deck. Wood offers a classic look and is generally more affordable upfront, while composite materials are highly durable and require minimal upkeep. Regardless of your choice, having a detailed material and tool list is essential for a smooth building process.
| Planning Checklist | Description |
|---|---|
| Site Evaluation | Check for underground utilities and evaluate soil stability. |
| Building Permits | Secure all necessary approvals from local building departments. |
| Material Selection | Choose between pressure-treated wood, cedar, or composite decking. |
| Tool Inventory | Ensure you have all required tools, including saws, drills, and safety gear. |
| Design Layout | Finalize the deck’s dimensions and placement relative to the house. |
When preparing your site, it is also important to consider the “3/4/5 rule” to ensure your deck is perfectly square. This simple geometric principle involves measuring three feet along one side and four feet along the adjacent side; the diagonal between these two points must be exactly five feet for the corner to be a perfect 90-degree angle. This level of precision during the preparation phase will make the subsequent framing and decking steps much easier and more accurate.
Framing the Structure: Building the Skeleton
Framing a deck requires installing a ledger board, setting footings below the frost line, and erecting posts and beams. This structural “skeleton” provides the essential support for your decking boards and ensures long-term stability. A well-built frame is the key to a deck that will last for decades and remain safe for all users.
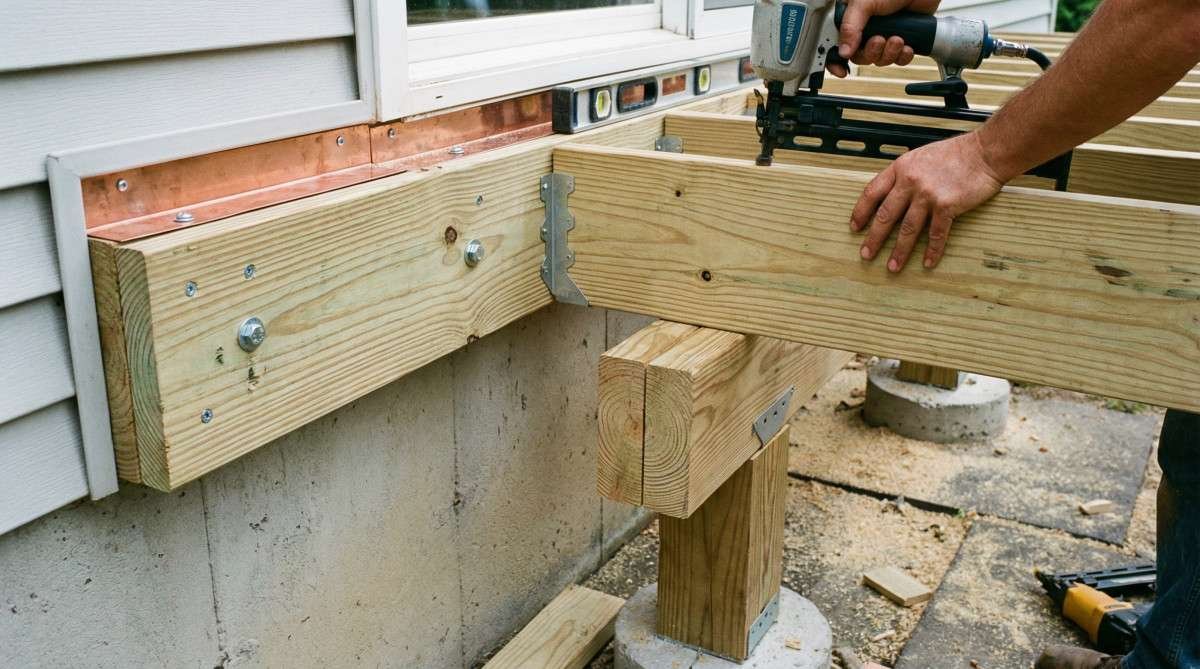
The first step in framing is attaching the ledger board to the house. This critical connection must be perfectly level and securely fastened with heavy-duty bolts or lag screws. To prevent rot and water damage, it is essential to install flashing over the ledger board to direct water away from the house. This step is often overlooked by DIYers, leading to significant structural damage to the home over time. According to the American Wood Council (2018), the ledger board must be properly attached to the house’s structural rim joist to provide the necessary support for the deck’s weight [2].
Once the ledger board is in place, you can begin digging and pouring the footers for your deck posts. These footers must be dug below the frost line in your area to prevent the deck from shifting during the winter months. The size and depth of the footers will depend on the size of your deck and the type of soil on your property. After the concrete has cured, you can install the posts, beams, and joists that will form the deck’s main structural frame.
| Joist Spacing Comparison | Description |
|---|---|
| 12-inch Spacing | Recommended for diagonal decking or composite materials to prevent sagging. |
| 16-inch Spacing | Standard spacing for most pressure-treated wood decking. |
| 24-inch Spacing | Used for heavy-duty decking or large-scale commercial decks. |
One of the most common DIY mistakes during the framing phase is failing to ensure that all footings are perfectly level. This can lead to a deck that is uneven or even structurally unsound. To avoid this, use a transit level or a long straight board with a level on top to check the height of each footing before pouring the concrete. If you encounter any issues during the framing process, it is always best to consult with a professional to ensure that your deck is built to code and safe for use.
Laying the Decking and Finishing Touches
Laying decking involves fastening boards with consistent spacing and installing railings for safety. Finishing touches like fascia boards and protective stains enhance the deck’s appearance and durability against the elements. This final phase of the project is where the deck truly comes to life and becomes a beautiful and functional addition to your home.
The first step in laying the decking is to choose between hidden and face fastening. Hidden fasteners offer a clean, professional look with no visible screw heads, while face fastening is generally more affordable and easier to install. Regardless of your choice, it is essential to maintain consistent spacing between the boards to allow for drainage and thermal expansion. According to the Consumer Product Safety Commission (2023), proper railing height and baluster spacing are critical for preventing falls and ensuring the safety of all deck users [3].
Once the decking boards are in place, you can begin installing the railings and stairs. This is another critical safety step that must be done with precision. The railing height should be at least 36 inches for residential decks, and the baluster spacing should be no more than 4 inches to prevent small children from slipping through. After the railings and stairs are installed, you can add the final finishing touches like fascia boards and trim to give your deck a polished, professional look.
| Maintenance Schedule | Task |
|---|---|
| Annual Inspection | Check for loose boards, rusted fasteners, and signs of rot or insect damage. |
| Semi-Annual Cleaning | Use a deck cleaner to remove dirt, mold, and mildew. |
| Every 2-3 Years | Re-apply a protective stain or sealer to prevent water damage and UV fading. |
Finally, it is important to develop a regular maintenance schedule for your new deck. This will help to ensure that your deck remains beautiful and safe for many years to come. Whether you choose natural wood or composite materials, regular cleaning and inspection are essential for a long-lasting deck. By following these expert steps and taking the time to do the job right, you can enjoy your new DIY deck for many years to come.
Frequently Asked Questions (FAQ)
What is the 3/4/5 rule for decks?
The 3/4/5 rule is a simple geometric principle used to ensure that a corner is perfectly square. Measure 3 feet along one side and 4 feet along the adjacent side; the diagonal between these two points must be exactly 5 feet for the corner to be a perfect 90-degree angle.
How to build a deck step by step for beginners?
Building a deck for beginners involves several key steps: planning and permitting, site preparation, framing the structure, laying the decking, and installing railings and stairs. By following a detailed guide and taking the time to do each step correctly, even a beginner can build a professional-quality deck.
What’s the average cost for a 20×20 deck?
The average cost for a 20×20 deck can vary widely depending on the materials used and the complexity of the design. On average, you can expect to pay between $10,000 and $20,000 for a professionally built deck of this size, while a DIY project can cost significantly less.
Do I need 2×8 or 2×10 joists for my deck?
The size of the joists you need will depend on the span of the deck and the type of wood you are using. Generally, 2×8 joists are sufficient for spans up to 10 feet, while 2×10 joists are needed for spans up to 12 feet or more.
Can I build a deck without a permit?
In most areas, a building permit is required for any deck that is attached to the house or more than 30 inches above the ground. Building a deck without a permit can lead to legal issues, fines, and even the required removal of the deck.
How do I maintain my deck?
Maintaining your deck involves regular cleaning, inspection for damage, and the application of a protective stain or sealer every 2-3 years. This will help to prevent rot, water damage, and UV fading, ensuring that your deck remains beautiful and safe for many years to come.
Conclusion
Building a DIY deck is a significant project that requires careful planning and execution. By following the steps outlined in this guide, you can create a beautiful and functional outdoor space that will add value to your home and provide years of enjoyment for you and your family. Whether you are a beginner or an experienced DIYer, the satisfaction of building your own deck is well worth the effort.