Drywall damage is an almost inevitable part of homeownership, often occurring during furniture moves, door handle impacts, or minor plumbing repairs, says Keyrenter Folsom specialists. While small dents and nail holes are easily filled with a dab of spackle, learning how to patch large holes in drywall—those exceeding six inches in diameter—requires a more structured approach. A hole of this size lacks the internal support necessary for a simple surface patch, meaning you must rebuild the wall’s integrity from the inside out to ensure a flat, crack-resistant finish.
Essential Tools and Materials for Large Drywall Repairs
To successfully patch large drywall holes, you need a combination of structural support and finishing compounds. Key items include a drywall saw, utility knife, joint compound (mud), mesh tape, drywall screws, and a replacement drywall panel. For holes without nearby studs, wooden furring strips are necessary to provide a solid backing for the patch. Having the right tools on hand prevents the frustration of mid-project hardware store runs and ensures that each layer of the repair is applied with precision.
According to Lowe’s (2026), locating wall studs is a critical first step before any cutting begins to avoid damaging hidden utilities like electrical wiring or plumbing lines [1]. Using a stud finder can help you determine if you can anchor your patch directly to the home’s framing or if you will need to install secondary support. Additionally, choosing the correct type of joint compound—all-purpose mud for the base layers and lightweight topping mud for the final coat—will significantly improve the ease of sanding and the quality of the final surface.
| Standard Tool | Professional Alternative | Primary Use Case |
|---|---|---|
| Drywall Saw | Keyhole Saw or Oscillating Multi-tool | Cutting clean, square openings in the existing wall. |
| Standard Utility Knife | Fixed-blade Utility Knife | Scoring and snapping new drywall panels to size. |
| Plastic Putty Knife | Stainless Steel Taping Knife (6″ and 10″) | Applying and feathering joint compound for a flat finish. |
| Sandpaper Sheets | Sanding Block or Pole Sander | Smoothing dried mud without creating deep gouges. |
When working with large patches, the replacement drywall panel should match the thickness of your existing wall, which is typically 1/2 inch for standard rooms and 5/8 inch for fire-rated areas like garages. Using a panel that is too thin will create a depression that requires excessive mudding to level, while a panel that is too thick will result in a noticeable hump on the wall surface. Taking the time to measure your wall’s thickness before purchasing materials is a small step that saves hours of labor during the finishing phase.
Step-by-Step: The Furring Strip Method for Massive Holes
The furring strip method is the gold standard for repairing drywall holes larger than six inches that don’t align with existing studs. By screwing thin wooden strips behind the existing drywall, you create a new “stud” surface to anchor your patch. This ensures the repair remains stable and resists cracking over time as the house settles. Without this internal support, a large patch is prone to movement, which eventually leads to unsightly hairline fractures in the paint.
The process begins by cutting the damaged area into a clean square or rectangle with a drywall saw, as straight lines are far easier to patch than irregular circles. Once the hole is squared, cut two pieces of 1×2 or 1×3 furring strips, each about four inches longer than the height of the hole. Insert these strips into the wall, centering them behind the left and right edges of the opening, and screw them into the existing drywall. The screw heads should be driven just deep enough to create a slight dimple in the paper without tearing it, a technique known as “setting” the screw.
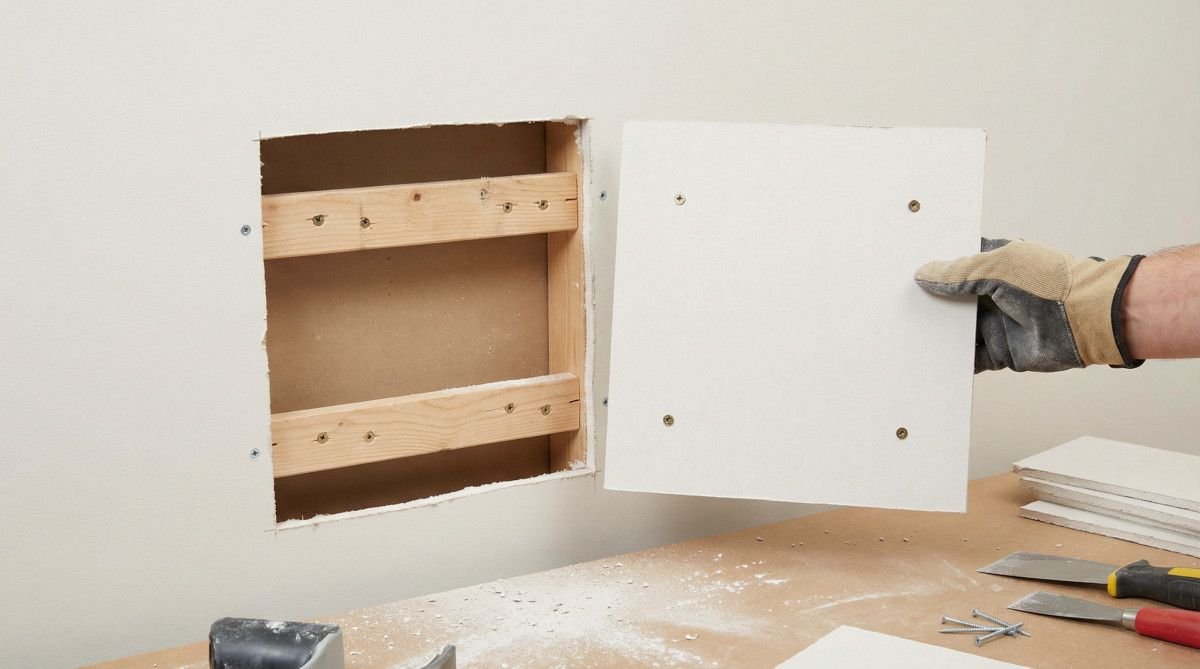
After the furring strips are secured, cut a piece of new drywall to fit snugly into the opening. Screw this patch directly into the furring strips you just installed. At this stage, the patch should be flush with the surrounding wall, providing a solid foundation for the finishing layers. Cover the seams with self-adhesive mesh tape, which provides the necessary tensile strength to prevent the joint compound from cracking. This structural approach mimics the way drywall is installed on studs, offering a permanent fix for even the most significant wall damage.
The California Patch: Best for Medium-to-Large Holes
A California patch, also known as a butterfly patch, is an ingenious technique for holes up to six inches where structural backing isn’t strictly required. It utilizes the paper backing of a new drywall piece as its own “tape,” creating a thin, strong bond that requires less mudding and sanding than traditional methods. This method is particularly effective for holes that are too large for a standard patch kit but too small to justify the effort of installing wooden furring strips.
To create a California patch, cut a piece of new drywall that is approximately two inches larger on all sides than the hole you are repairing. On the back of this new piece, score the gypsum core to the exact dimensions of the hole, then carefully snap and peel away the excess gypsum while leaving the front paper intact. This leaves you with a square of drywall that fits perfectly into the hole, surrounded by a two-inch flange of paper. This paper flange acts as the joint tape, eliminating the need for additional mesh or paper tape during the application process.
As noted by Home Depot (2025), a self-adhesive mesh patch can also be used for holes up to 6 inches, but the California patch provides a more seamless gypsum-to-gypsum bond [2]. Before inserting the patch, apply a thin layer of joint compound around the edges of the hole. Press the patch into place, smoothing the paper flange into the wet mud with a taping knife. Once the first layer is dry, apply a second coat of mud over the entire patch, feathering the edges to blend the repair with the surrounding wall. This technique is favored by professionals for its speed and the minimal buildup it creates on the wall surface.
Advanced Finishing: Feathering and Texturing for a Seamless Look
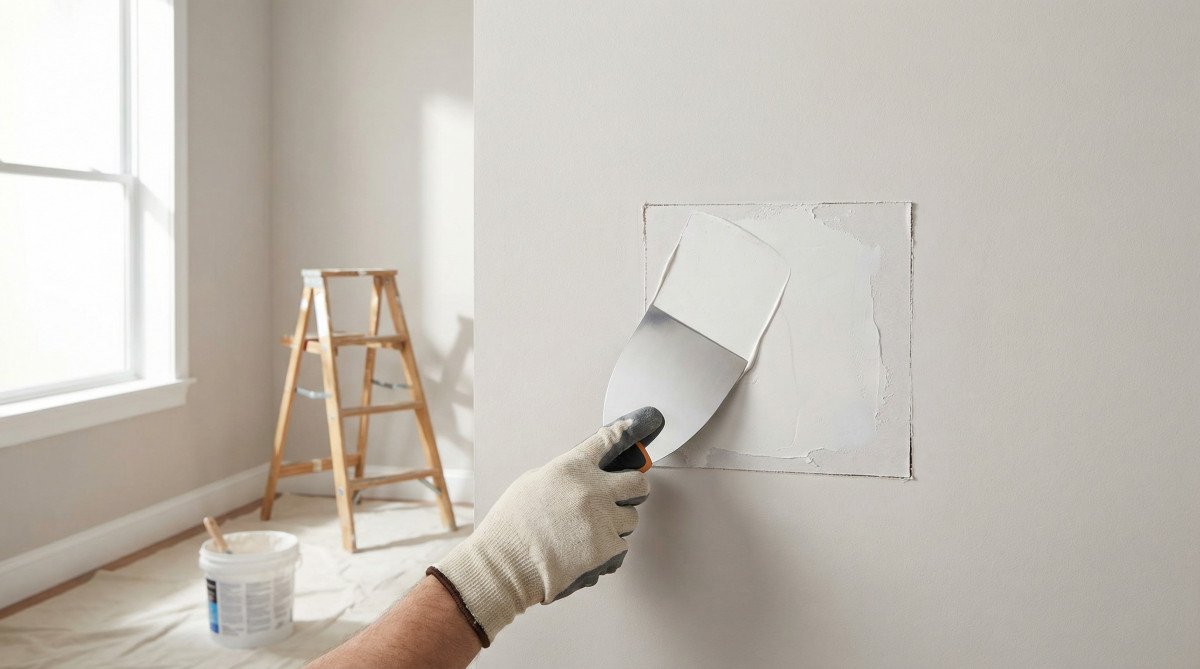
Achieving a seamless finish requires “feathering” the joint compound, which involves spreading the mud in increasingly thin layers far beyond the edges of the patch. For textured walls, you must recreate the existing pattern using a sponge, stiff brush, or specialized texture spray to ensure the repair is invisible once painted. A successful repair is not just about filling the hole, but about mimicking the surrounding wall’s texture and light-reflecting properties.
The first coat of mud should be applied with a 6-inch taping knife, filling the gaps and covering the tape or paper flange. Once this layer is completely dry, sand away any high spots and apply a second coat with a 10-inch or 12-inch knife. The goal is to “feather” the edges by increasing the pressure on the outer side of the blade, making the mud layer thinner as it moves away from the patch. This creates a gradual transition that the human eye cannot detect after painting.
For walls with a knockdown or orange peel texture, matching the existing pattern is the most challenging step. After the final layer of mud is dry and sanded, apply a matching texture spray in a circular motion. If you are matching a knockdown finish, wait about 15 minutes for the texture to “set” before lightly flattening the peaks with a wide taping knife. This attention to detail is what separates a professional repair from an obvious DIY patch, ensuring that your wall looks as good as new.
Frequently Asked Questions: Patching Large Drywall Holes
How do you fix a 10-inch hole without a stud? To fix a large hole without a stud, you must use the furring strip method. By screwing wooden strips behind the existing drywall, you create a solid backing for the new patch to attach to. This prevents the patch from falling into the wall cavity or cracking over time due to lack of support.
Can I use spackle instead of joint compound for large holes? Spackle is not recommended for large holes as it lacks the structural strength and adhesive properties of joint compound. Spackle is designed for small nail holes and dents, whereas joint compound is specifically formulated for the multi-layer process of taping and finishing large patches.
Why is my drywall patch cracking? Drywall patches typically crack due to insufficient structural support or applying mud layers that are too thick. Using mesh tape and ensuring the patch is securely screwed into a stud or furring strip will provide the necessary stability to prevent cracking as the house settles.
Do I need to prime the patch before painting? Yes, priming is essential for a professional finish. Joint compound is highly porous and will absorb paint differently than the surrounding wall, leading to “flashing” or visible patches. A coat of primer seals the mud and creates a uniform surface for the final paint layers.
How long does joint compound take to dry? Drying times vary depending on humidity and temperature, but most all-purpose joint compounds take 12 to 24 hours per layer. For faster results, you can use “hot mud,” a setting-type compound that hardens in 20, 45, or 90 minutes regardless of the environmental conditions.
Conclusion
Learning how to patch large holes in drywall is a valuable skill that can save you hundreds of dollars in professional repair costs. Whether you choose the structural reliability of the furring strip method or the efficient elegance of the California patch, the key to success lies in patience and attention to detail. By taking the time to properly support your patch, feather your mud layers, and match the existing wall texture, you can achieve a repair that is truly invisible. With the right tools and a bit of practice, even the most daunting wall damage can be restored to its original, pristine condition.