
Installing a ceiling fan without existing wiring requires cutting a new ceiling opening, mounting a fan-rated electrical box to the structural joists, and routing NM-B cable from a nearby power source to the new location, shares HCM Property Management. This process ensures the heavy fixture receives adequate physical support and safe electrical power. Proper installation eliminates the risk of ceiling damage and electrical hazards caused by constant motor vibration.
According to the U.S. Department of Energy (2024), operating a ceiling fan creates a wind chill effect that allows homeowners to raise their thermostat settings by approximately 4°F without a noticeable reduction in comfort. This temperature adjustment translates directly to lower monthly utility bills during peak cooling seasons. Achieving these benefits in a room currently lacking overhead electrical connections involves strategic planning and specific hardware.
The structural demands of a spinning motor differ significantly from those of a static light bulb. A standard plastic junction box cannot handle the dynamic load of a fan, which typically weighs between 15 and 50 pounds. Securing the unit requires hardware explicitly tested and listed for fan support, alongside new circuitry that complies with national safety standards.
Understanding the Requirements for New Ceiling Fan Installations
Installing a ceiling fan without existing wiring requires running new NM-B electrical cable from a power source, mounting a fan-rated electrical box to a ceiling joist, and securing proper permits. This ensures the heavy fixture operates safely without vibrating loose or causing electrical hazards.
The National Electrical Code (NEC) Section 314.27(B) mandates that any electrical box used for this purpose must be specifically listed to support a ceiling fan. Standard light fixture boxes are designed to hold lightweight static loads, usually under 10 pounds. When subjected to the rotational torque and weight of a fan, these standard boxes can quickly fail, leading to the entire unit detaching from the ceiling.
Fan-rated boxes are engineered with reinforced mounting brackets and heavy-duty screws that anchor directly into the wooden ceiling joists. Many of these specialized boxes are rated to support fixtures weighing up to 70 pounds. Local building authorities generally require a permit for running new electrical circuits, as improper wire routing poses a severe fire risk. Securing a permit guarantees that the new cable path, switch configuration, and box mounting meet strict safety protocols.
Essential Tools and Materials for the Job
The essential tools for this project include a non-contact voltage tester, a drywall saw, wire strippers, and fish tape. You will also need a fan-rated electrical box, an expandable support brace, and the appropriate 14/2 or 14/3 NM-B cable to establish the new electrical connection.
Safety gear forms the foundation of any electrical work. A reliable non-contact voltage tester verifies that power is completely shut off before any cutting or stripping begins. For the physical installation, a stud finder accurately locates the ceiling joists, while a sturdy drywall saw creates the precise circular opening needed for the new junction box.
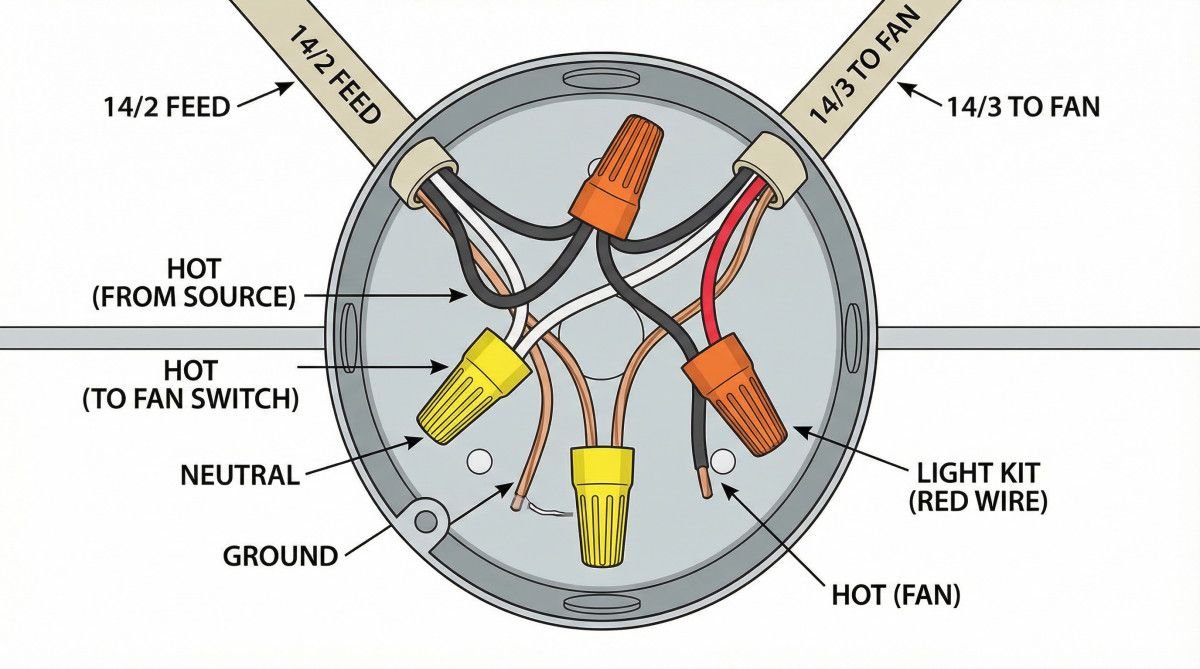
Selecting the correct Non-Metallic (NM-B) electrical cable depends entirely on how the fan will be controlled. The standard residential circuit typically utilizes 14-gauge wire on a 15-amp breaker. A 14/2 cable contains two insulated conductors (black and white) plus a bare ground wire, making it suitable for a single wall switch that controls both the fan and light simultaneously. Conversely, a 14/3 cable includes an additional red conductor. This third wire allows for separate wall switches—one dedicated to the fan motor and the other to the light kit.
| Cable Type | Conductors Included | Best Application |
|---|---|---|
| 14/2 NM-B | Black (Hot), White (Neutral), Ground | Single switch operation or remote-control setups |
| 14/3 NM-B | Black (Hot), Red (Hot), White (Neutral), Ground | Independent wall switches for fan and light |
Three Methods to Install a Fan Without Existing Wiring
You can install a ceiling fan without existing wiring using three primary methods: accessing the ceiling from an attic to drop wires, using an expandable fan brace through a small drywall hole, or surface-mounting raceway cables for minimal structural disruption.
The layout of the home dictates which approach will be the most efficient and least destructive. Each technique requires different hardware but achieves the same goal of providing a secure, code-compliant mounting point for the heavy motor.
Method 1: The Attic Access Approach
Working from an unfinished attic above the target room offers the cleanest installation path. This method provides unobstructed access to the ceiling joists, making it straightforward to nail a heavy-duty fan-rated box directly to the structural wood. Routing the NM-B cable from a nearby junction box or service panel down to the new location is significantly easier when the framing is exposed.
Method 2: Using an Expandable Fan Brace
When attic access is unavailable, such as on the first floor of a two-story home, an expandable fan brace provides a robust solution. This specialized hardware requires cutting only a single, four-inch circular hole in the drywall. The metal brace slips through the opening and twists outward until its spiked ends bite firmly into the adjacent joists. Once the brace locks into place, the fan-rated box bolts directly to the center of the metal shaft.

Method 3: Surface Raceway Solutions
Homes with concrete ceilings or intricate plasterwork often prohibit cutting into the surface. In these scenarios, a surface raceway system paired with a low-profile “pancake” fan box offers a practical alternative. The metal or plastic raceway channels the electrical wiring securely along the surface of the ceiling and walls, eliminating the need to fish cables through enclosed cavities. While the wiring remains visible, the raceway can be painted to blend seamlessly with the surrounding decor.
Step-by-Step Guide to Wiring Your New Ceiling Fan
Wiring a new ceiling fan involves turning off the main breaker, routing the NM-B cable from a power source to the fan box, and connecting the corresponding black, white, and ground wires. If installing a separate light switch, a 14/3 cable is required for independent control.
The electrical phase of the project demands strict adherence to safety protocols. A single loose connection can cause the motor to malfunction or create a severe fire hazard. Professional electricians rely on systematic testing at every stage to verify that the circuit is completely dead before handling bare copper.
Step 1: Turn Off the Power Supply
Locate the main electrical panel and flip the breaker corresponding to the room where the installation will occur. Never rely solely on a wall switch to cut power, as the circuit may still be energized. Use a non-contact voltage tester on nearby outlets and any existing wiring to confirm the electricity is entirely disabled.
Step 2: Route the Electrical Cable
Using a flexible metal fish tape, pull the new NM-B cable from the chosen power source—such as an existing receptacle or switch box—through the wall cavity and across the ceiling to the new fan box. Secure the cable with insulated staples along exposed framing to prevent tension on the final connections. Leave approximately eight inches of excess wire protruding from the ceiling box to facilitate easy splicing.
Step 3: Make the Final Connections
Strip the outer sheathing of the cable to expose the individual conductors. Connect the green or bare copper ground wire to the grounding screw on the mounting bracket. Twist the white neutral wire from the ceiling together with the white wire from the fan using a wire nut. Finally, join the black hot wire from the ceiling to the black wire on the fan motor. If utilizing a 14/3 cable for a light kit, connect the red ceiling wire to the blue light wire on the fixture.
Troubleshooting Common Post-Installation Issues
After installing your ceiling fan, common issues like wobbling or humming can often be resolved by balancing the blades with a weighted kit, checking for loose mounting screws, or ensuring the wall switch is compatible with the fan motor.
A severely wobbling fan usually indicates an imbalance in the blade weight distribution rather than a flawed ceiling mount. Most manufacturers include a small balancing kit containing plastic clips and adhesive weights. By systematically placing the clip on different blades and running the motor, homeowners can pinpoint the unbalanced side and apply a permanent weight to correct the rotation.
Unexpected switch behavior frequently occurs when attempting to copy the wiring configuration of a previous fixture. A wall switch designed solely for a dimmable light bulb will cause a fan motor to hum loudly and eventually burn out. Fan motors require specific speed-control switches or standard toggle switches paired with a pull-chain mechanism to operate safely.
Frequently Asked Questions
Do I need an electrician to install a ceiling fan without wiring?
While physically mounting the hardware is a manageable project, running new electrical wiring requires an electrician if you lack experience with residential circuits. Improperly routed cables or overloaded breakers pose significant fire hazards and often violate local building codes.
How much does it cost to install a ceiling fan without existing wiring?
The cost to install a ceiling fan without existing wiring typically ranges from $300 to $800, depending on the complexity of the cable routing and attic access. This price includes professional labor, the fan-rated box, and the necessary NM-B electrical cable, but excludes the cost of the fan itself.
Can a fan replace my existing light fixture?
A ceiling fan can only replace an existing light fixture if the current electrical box is specifically rated for fan support. Standard light boxes cannot handle the heavy weight and constant vibration of a spinning motor, making a hardware upgrade mandatory before installation.
Do wireless or smart fans eliminate the need for wiring?
Wireless remotes and smart fan features eliminate the need to run complex wiring down to a wall switch, but they do not eliminate the need for wiring entirely. The ceiling unit still requires a dedicated 120-volt power source routed through the ceiling to operate the receiver and motor.
Conclusion
Adding a ceiling fan to a room without prior wiring is a challenging but rewarding project that significantly improves indoor comfort and energy efficiency. By carefully selecting the right fan-rated box, routing the appropriate cables, and following strict electrical safety codes, you can achieve a professional-grade installation.
Whether utilizing an expandable brace from below or securing hardware from an open attic, the structural integrity of the mount remains the most critical factor. Taking the time to verify voltage, match the correct wire gauges, and balance the finished blades ensures the new fixture will provide quiet, reliable cooling for years to come.