Why Proper Wall Preparation is the Secret to a Perfect Paint Job
According to Portside Property Management Mount Pleasant, the relationship between surface preparation and paint performance is well-established in the coatings industry. Paint is designed to adhere to clean, smooth, stable surfaces. When applied over dust, grease, loose paint, or unrepaired damage, even the highest-quality paint will fail prematurely, exhibiting problems such as poor adhesion, uneven sheen, visible brush marks, and early peeling. In contrast, a properly prepared surface allows the paint to bond at the molecular level, resulting in a finish that is not only beautiful but also durable and resistant to the wear and tear of daily life. The time invested in preparation is always repaid many times over in the longevity and quality of the finished result. Professional painters typically spend as much time preparing a surface as they do applying the paint itself, a ratio that DIY painters would do well to emulate.
Gathering Your Wall Prep Tools and Materials
Before beginning the preparation process, assembling all necessary tools and materials will ensure a smooth and efficient workflow. The following table provides a comprehensive list of wall prep supplies:
| Item | Purpose | Notes |
|---|---|---|
| TSP cleaner or degreaser | Cleaning walls | Rinse thoroughly after use |
| Lightweight spackle | Filling nail holes and small dents | Dries faster than joint compound |
| Setting-type joint compound | Repairing larger holes and cracks | Stronger than lightweight spackle |
| Putty knife (3-inch and 6-inch) | Applying and feathering compounds | Flexible blade for best results |
| Sandpaper (120 and 220-grit) | Smoothing repairs and scuff sanding | Use a sanding block for flat surfaces |
| Painter’s tape (1.5-inch) | Protecting trim and edges | Remove while paint is still slightly wet |
| Primer | Sealing and preparing surface | Use shellac primer for stains and new drywall |
| Drop cloths | Protecting floors and furniture | Canvas cloths are more durable than plastic |
Step 1: Cleaning the Walls to Remove Dust and Grease
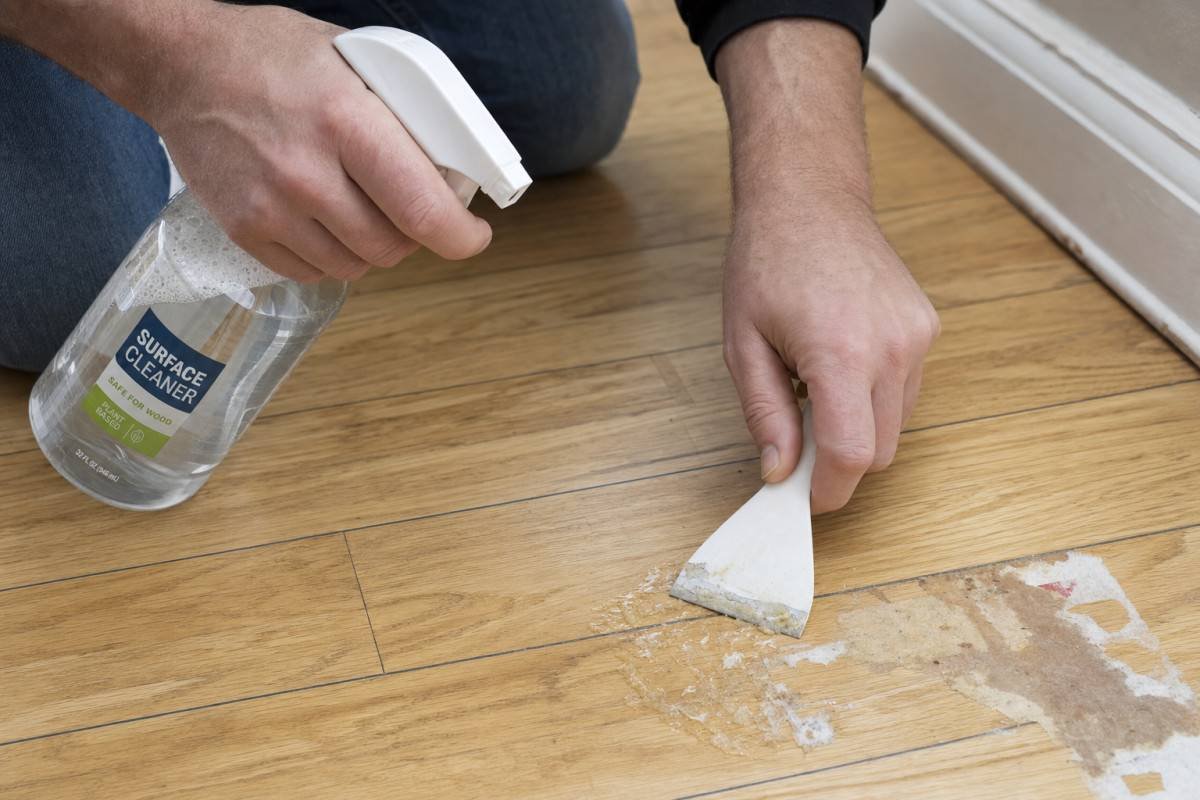
The first and most fundamental step in wall preparation is thorough cleaning. Walls accumulate a surprising amount of dust, grease, cooking vapors, fingerprints, and other contaminants over time, particularly in kitchens, bathrooms, and high-traffic hallways. These contaminants act as a barrier between the paint and the wall surface, preventing proper adhesion and causing the paint to peel or flake prematurely. Begin by dusting the walls from top to bottom using a dry microfiber cloth or a vacuum with a brush attachment to remove loose dust and cobwebs. Follow with a wash using a solution of trisodium phosphate (TSP) or a dedicated wall degreaser diluted in warm water, applied with a sponge and wrung out to avoid over-wetting the surface. Pay particular attention to areas around light switches, door handles, and baseboards where grease and fingerprints are most concentrated. Rinse the walls with clean water and allow them to dry completely, typically for at least 24 hours, before proceeding to the next step.
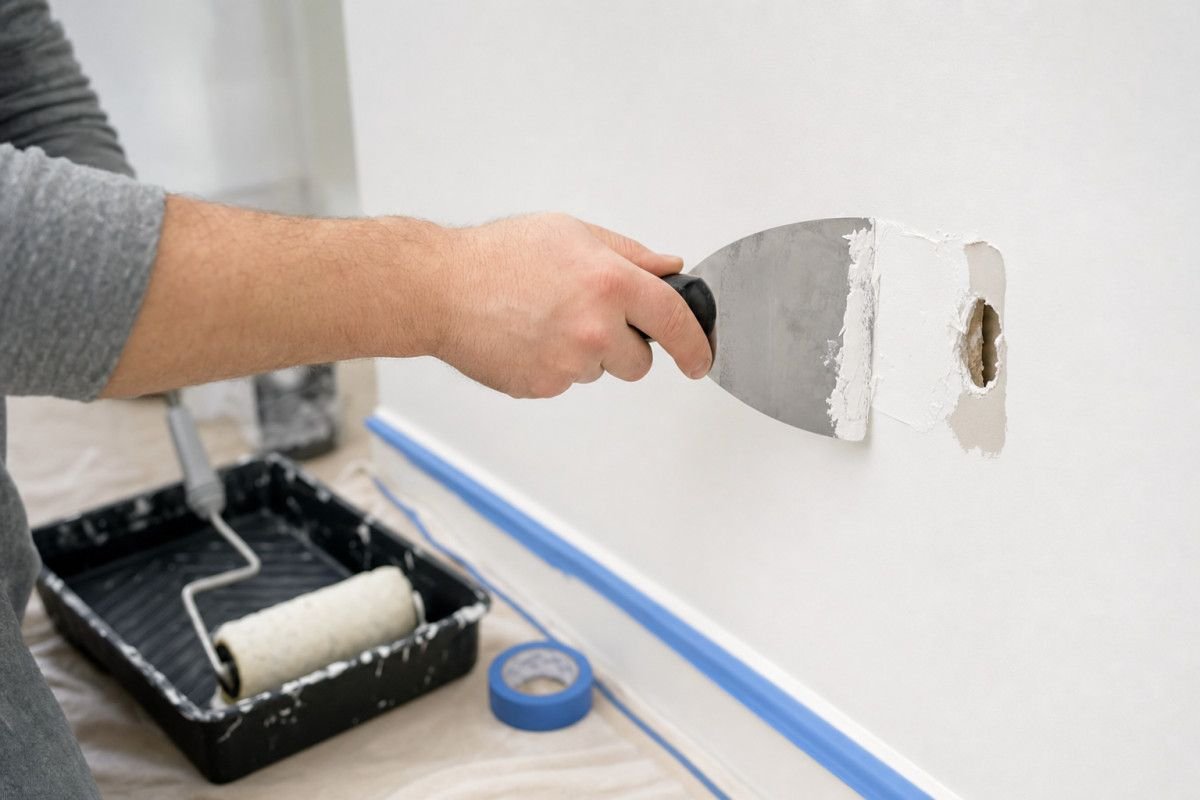
Step 2: Inspecting and Repairing Damage, Holes, and Cracks
With clean, dry walls, you can now conduct a thorough inspection for damage that needs to be repaired before painting. Work systematically across the entire wall surface in good lighting, looking for nail holes, dents, cracks, loose paint, and areas of water damage. Small nail holes and minor dents can be filled with lightweight spackle applied with a 3-inch putty knife, pressed firmly into the hole and feathered smooth with the surrounding surface. Larger holes up to 6 inches in diameter require a patch kit or a piece of drywall cut to size and secured with joint compound. Cracks should be widened slightly with a putty knife to create a V-shaped channel, then filled with setting-type joint compound, which is stronger and more crack-resistant than lightweight spackle. Any areas of water-stained or peeling paint must be scraped back to a firm edge and the underlying cause of the moisture addressed before repainting, or the problem will recur.
Step 3: Sanding for a Smooth and Flawless Surface
Once all repairs have dried completely, sanding is the step that transforms a patched wall into a smooth, paint-ready canvas. Begin with 120-grit sandpaper to sand all repaired areas, feathering the edges of the compound into the surrounding wall surface so that there is no visible ridge or bump. Work in a circular motion and check your progress frequently by holding a work light at a raking angle to the wall, which will reveal any remaining high spots or imperfections. After sanding all repairs, lightly scuff the entire wall surface with 220-grit sandpaper or a fine sanding sponge. This step, often skipped by DIY painters, creates a slightly roughened surface that dramatically improves paint adhesion on previously painted walls. After sanding, vacuum the walls thoroughly and wipe them down with a damp microfiber cloth to remove all sanding dust, which can contaminate the paint if not removed.
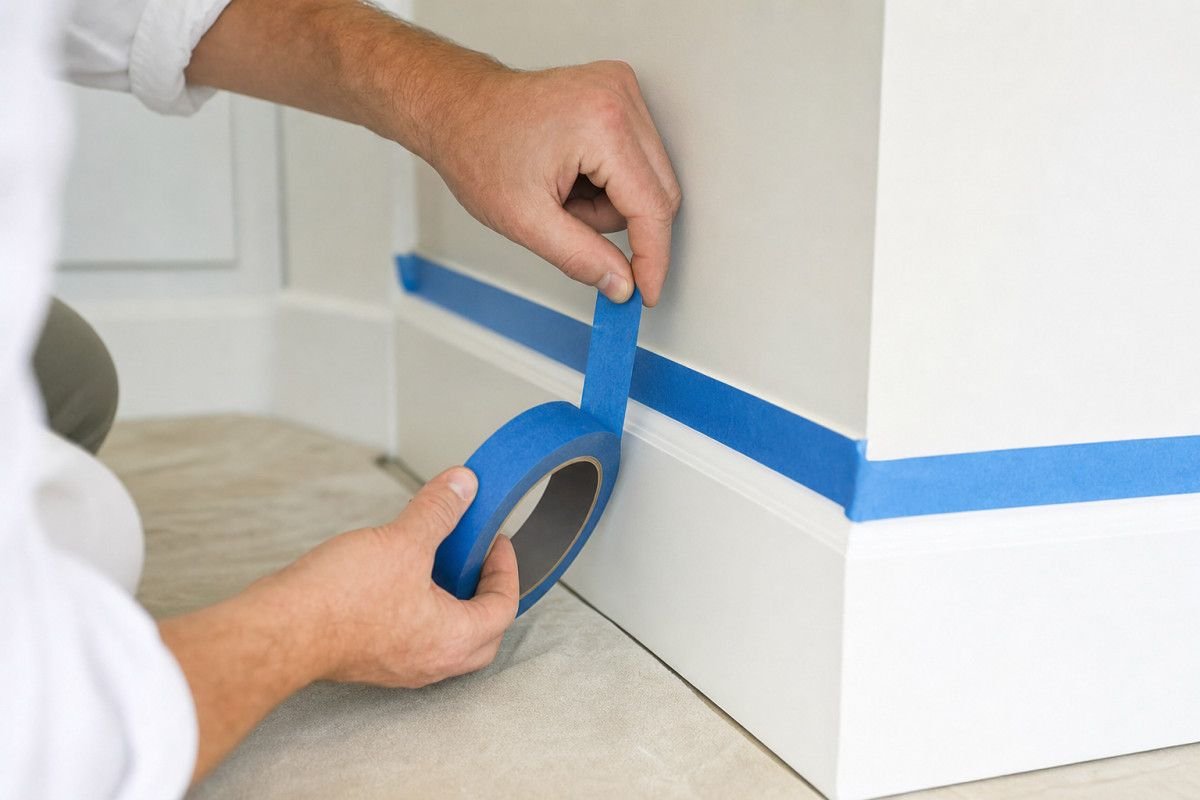
Step 4: Taping and Protecting Trim, Floors, and Fixtures
Protecting surfaces that are not being painted is an essential step that saves significant cleanup time and prevents accidental damage to trim, floors, and fixtures. Apply painter’s tape along all edges where the wall meets the ceiling, baseboards, door trim, and window trim, pressing the edge of the tape firmly with a putty knife to create a clean seal and prevent paint from bleeding underneath. Lay drop cloths over all flooring, extending them at least two feet from the base of the wall to catch any drips or spatters. Remove or cover light switch plates, outlet covers, and any wall-mounted fixtures that cannot be removed. For ceiling fans and light fixtures that cannot be removed, use plastic sheeting secured with painter’s tape to protect them. Taking the time to protect all adjacent surfaces properly will result in a cleaner finished product and eliminate the need for tedious touch-up work after painting.
Step 5: The Crucial Role of Primer in Wall Preparation
Primer is the final and arguably most important step in wall preparation, yet it is frequently omitted by DIY painters in an attempt to save time and money. This is a false economy, as skipping primer almost always results in the need for additional coats of topcoat paint, uneven sheen, and poor coverage over repaired areas. Primer serves several critical functions: it seals porous surfaces such as new drywall and spackle patches, preventing the topcoat from soaking in unevenly; it improves adhesion between the wall surface and the paint; and it provides a uniform base color that allows the topcoat to achieve full coverage in fewer coats. For walls with stains, smoke damage, or water marks, a shellac-based primer is the most effective choice, as it seals these problem areas and prevents them from bleeding through the topcoat. For new drywall or previously unpainted surfaces, a PVA drywall primer is the appropriate choice. Apply primer with a roller and brush, allow it to dry fully according to the manufacturer’s instructions, and lightly sand with 220-grit sandpaper before applying the topcoat.
Quick Answer: Master the essential steps to prepare walls for painting, from cleaning and repairing holes to sanding, priming, and taping for a flawless professional finish.
Frequently Asked Questions (FAQ)
Do I need to wash walls before painting?
Yes, washing walls before painting is essential. Use a TSP solution or a mild degreaser to remove dust, grease, and grime that can prevent paint from adhering properly.
How do I repair small holes in walls before painting?
Fill small nail holes with lightweight spackle using a putty knife, let it dry completely, sand smooth with 120-grit sandpaper, and apply a spot primer before painting.
Do I need to prime walls before painting?
Priming is essential when painting over new drywall, dark colors, stains, or patched areas. It improves paint adhesion, ensures even color coverage, and can reduce the number of topcoats needed.
How long should I wait after priming before painting?
Most water-based primers dry to the touch in 30 minutes to 1 hour, but you should wait a full 2 to 4 hours before applying the first coat of paint for best results.
What grit sandpaper should I use to prepare walls for painting?
Use 120-grit sandpaper for smoothing patched areas and 220-grit for final scuff sanding of previously painted walls to improve adhesion without leaving visible scratches.
Conclusion
Making informed decisions about prepare walls for painting requires careful consideration of the factors outlined in this guide. By understanding the key principles, evaluating your specific needs, and following the practical steps described above, you can achieve results that are both functional and long-lasting. Whether you are a first-time homeowner or an experienced DIY enthusiast, the information in this guide provides a solid foundation for success. Take the time to plan thoroughly, invest in quality materials, and approach each step with care, and the outcome will reflect that investment for years to come.